Hi!
Skittered to San Antonio today to check out the Japanese Tea Garden they had there. I found a not-so-high-traffic spot and painted some koi.
Plein Air painting is no joke. It's hard work lugging your painting gear all over the place in 103-degree weather, then sitting in one spot trying not to sweat on your paper. Studio painting is for wussies. It's all worth it when you gather a crowd and they exclaim how beautiful your painting is. :) That doesn't happen in a studio!
OK now for the step-by-step:
Step one: Get yourself a cool hat. I knitted this hat! And a lady was like: OMG! COOL HAT! Did you make it? and I'm all... YEAH MAN! FIST BUMP. Well, it didn't go quite like that, but close.
Step Two and Three - draw it, and paint it. When I draw, I go from general to detailed. When I paint, I usually do the opposite - from detailed to general, which some say is counter-intuitive.
So, when I put down a stroke, I try to get the Color, Value, and Edge quality right the first time. Unlike many watercolorists, I don't build up color and value from light washes, I try to get it right immediately. This is called Alla Prima painting, Alla Prima is Italian for "First Attempt".
First Attempt painting is fast. Faster than glazing. It's a little more scary because a big bold dark mark cannot be built up to. It's there right away. But speed is a huge advantage when plein air painting where you want to be quick. Another advantage of alla prima watercolor painting is the ability to soften edges. When you put a mark down, you can soften it immediately by working the neighboring color or by touching it with water. Can't do that when you're glazing.
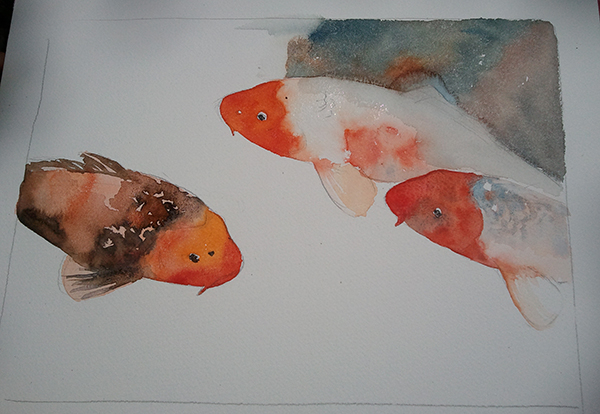
Whenever I paint, I try to paint things that are next to each other, relating their color and edge quality as I go. I'm not all over the place, but I do keep the overall piece in mind, in my head, about where I want specific values to go. As you can see, I started with the fish head, then the water around the fish, keeping it wet-on-wet so the water bleeds into the fish a little bit.
Then I take a break. Here's me with a GIANT LOLLIPOP. (Cotton candy flavored.)
I lied a little. This painting is not completely Alla Prima. I glazed the water. The reason is that it was necessary. In order to get large dark washes you need a lot of water. That unfortunately washes down the colors and makes it wimpy. The alternative was to glaze. The water in the painting was glazed with Indigo Blue. It's a great pigment to glaze with. It doesn't lift as easily as other pigments. I did keep softening the indigo into the fish however. This integrates the fish into the water. Remember: hard edges separate, soft edges integrate. If the fish were all hard-edged, it would look like cardboard cutouts.
I added some subtle fishy shadows and voila, got yourself a koi painting.
Now show it off! Here's me Vanna Whiting it up.
Well, I hope you liked my painting and my step-by-step. I know, the instructions weren't that specific. For that you'll have to go to my youtube channel and follow the
tutorials. These are more like general tips and an overview of how I work.
Until next time!
Tiffanny