Hi!
Skittered to San Antonio today to check out the Japanese Tea Garden they had there. I found a not-so-high-traffic spot and painted some koi.
Plein Air painting is no joke. It's hard work lugging your painting gear all over the place in 103-degree weather, then sitting in one spot trying not to sweat on your paper. Studio painting is for wussies. It's all worth it when you gather a crowd and they exclaim how beautiful your painting is. :) That doesn't happen in a studio!
OK now for the step-by-step:
Step one: Get yourself a cool hat. I knitted this hat! And a lady was like: OMG! COOL HAT! Did you make it? and I'm all... YEAH MAN! FIST BUMP. Well, it didn't go quite like that, but close.
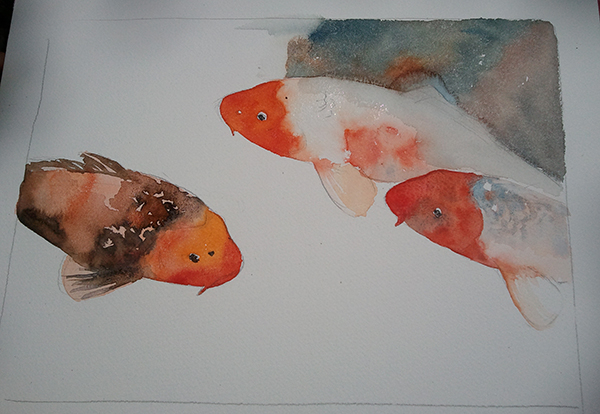
Step Two and Three - draw it, and paint it. When I draw, I go from general to detailed. When I paint, I usually do the opposite - from detailed to general, which some say is counter-intuitive.
So, when I put down a stroke, I try to get the Color, Value, and Edge quality right the first time. Unlike many watercolorists, I don't build up color and value from light washes, I try to get it right immediately. This is called Alla Prima painting, Alla Prima is Italian for "First Attempt".
First Attempt painting is fast. Faster than glazing. It's a little more scary because a big bold dark mark cannot be built up to. It's there right away. But speed is a huge advantage when plein air painting where you want to be quick. Another advantage of alla prima watercolor painting is the ability to soften edges. When you put a mark down, you can soften it immediately by working the neighboring color or by touching it with water. Can't do that when you're glazing.
Whenever I paint, I try to paint things that are next to each other, relating their color and edge quality as I go. I'm not all over the place, but I do keep the overall piece in mind, in my head, about where I want specific values to go. As you can see, I started with the fish head, then the water around the fish, keeping it wet-on-wet so the water bleeds into the fish a little bit.
Then I take a break. Here's me with a GIANT LOLLIPOP. (Cotton candy flavored.)
I lied a little. This painting is not completely Alla Prima. I glazed the water. The reason is that it was necessary. In order to get large dark washes you need a lot of water. That unfortunately washes down the colors and makes it wimpy. The alternative was to glaze. The water in the painting was glazed with Indigo Blue. It's a great pigment to glaze with. It doesn't lift as easily as other pigments. I did keep softening the indigo into the fish however. This integrates the fish into the water. Remember: hard edges separate, soft edges integrate. If the fish were all hard-edged, it would look like cardboard cutouts.
I added some subtle fishy shadows and voila, got yourself a koi painting.
Now show it off! Here's me Vanna Whiting it up.
Well, I hope you liked my painting and my step-by-step. I know, the instructions weren't that specific. For that you'll have to go to my youtube channel and follow the
tutorials. These are more like general tips and an overview of how I work.
Until next time!
Tiffanny


13 comments:
I love that you dissect your process and experience. Even though I myself don't like watercolor painting, I enjoy studying and analyzing the process of others doing it. I myself have some oil paintings that are semi finished that I keep telling myself I'll eventually get to, but my biggest problem is space. I have no space to set up a permanent area for my supplies so I get lazy and I just work on my digital projects. But I at least get to paint vicariously through you :)
beautiful painting! I personally dont have the patience for water colour so this is extra impressive to me :) your animal sketches are lovely too!
Hi Tiffany!
Very interesting this post, thanks for showing your art.
I went to link to youtube and I mean that in addition to very good watercolorist, your drawings in pencil (you call sketch) are wonderful!
It is a pleasure to come to your blog!
Lovely finished painting!
Good on you for gathering a crowd! I usually try and avoid that as much as possible! :'D
Stumbled upon your blog and I become a permanent fan. Lovely work. Can't get enough..
Nice painting. Confident. -and the hat is cool.
Oh Wow! Your Koi are gorgeous!
Tiffany,
Thanks so much for the kind words about my artwork. Although I don't agree with you, Your sketches are beautiful:) I love this koi painting too. You have a wonderful life to your artwork, Please keep in touch!
Cool hats make everything go better.
When you say 'glazing' do you mean layering washes on top of each other or do you mean a separate product (glaze) that you put over things? I'm going to go look at your tutorials to see if you've said anything about it there. When I see koi I always take photos of them. I can't resist them.
Hey everyone thanks so much for the nice comments.
F.Z. Harper - glazing meaning building up the values with a series of light washes. I try to get the values right the first time, but if the area to paint is particularly large and needs to be dark, I glaze because adding enough water for the paint to spread causes the values to be light, so I have to go over and over again until the value is just how I want it :) I hope this explains some things :)
Nice work, I don't enjoy the delicacy of watercolour but you handle it very well. I have a link to you in one of my posts, hope that's ok.
James.
Beautiful work.
These are beautiful Tiffany.
Post a Comment